I don't know about you but I have been in a real Halloween mood. And cool beans - this week's Bellarific Friday challenge is just that - Halloween! So in case you need some inspiration, I have Little Witchy to share with you. I had so much fun coloring her up with my Mom, Aunt and cousin this past weekend. And to give my card a little visual interest, I also colored and added row of Pumpykins. Only I cut them apart and added them in a bunch.
To create this scene I used a bunch of punches and dies. From Martha Stewart, the Fence and Spider Web border punches. From EK Success, I used the bat border punch and used the punched bats individually. From Spellbinders a Classic Circle die.
I've used Bella's Bestest paper and copics for my images which means that I also stamped them with Memento Tuxedo black ink. I love that Stamping Bella sells the refill ink. Now I don't throw my ink pads out - woo hoo less waste and way cheaper. All colored cardstock is Bazzil. The design paper is Spellbound by Making Memories. I bought this last year and dang I wish I had more.
If you haven't seen, this week's Tantalizing Toosday specials include 20% off October Afternoon Seaside collection as well as a sale on some stamps. A comment from you on the blog could win you some Bella Bucks.
Thanks for stopping by and hope you can make it back here on Friday to see another Halloween Bella.
Cath
Wednesday, September 29, 2010
Monday, September 27, 2010
Baby Carriage - Bella Style
Happy Monday!
I have a quick post to share with you today. It's Stamping Bella's Bella Baby Buggy Bumper. I was cruising the internet last week and found a card I wanted to case from Megan Lock to use this stamp with. Of course, the stamp and parts aren't exactly the same but I wanted to give credit for the layout to the rightful owner. This is how mine turned out.
I started with Bella's bestest paper, Memento Tuxedo Black ink, and copics. Then I added some shading with prismacolor pencils blended with gamsol. The image panel was cut using Circle and Blossom Nestibilities dies. Pink glitter was added to the buggy by first applying Quickie Glue and then sprinkling it on top. (Thanks Madison and McKenze for getting me this for Christmas last year.) The curvy sentiment panel was cut using a Tim Holtz die and then I hand drew the border. I didn't have a sentiment big enough so I stamped Martha Stewart block letters individually and then added sparkly Bella Glamor Dust glitter with the Quickie Glue pen. A few buttons were added to finish this panel off. Notice behind it though that I created a flag banner - I'm loving these. Both design papers are from a Me and My Big Ideas - girl 12x12 pack. The polka dots are flocked so they add neat texture.
I hope you're working on your Bellarific Friday Halloween card. Don't forget to send a photo to Emily@stampingbella.com by Thursday night. Gotta love the chance to win some Bella Bucks! And head on over to the blog to see what this week's Tantalizing Tooosday sale has in store for us.
See ya later and thanks for stopping by.
Cathy
Sunday, September 26, 2010
Flurry of Love
Hope you all are enjoying your weekends!!! I have been a stamping, teaching machine with my family. It's been fun but I think I needed 10 more hands to help with all their requests. One project I wanted to try was using my new MFT Pure Innocence stamp - Flurry of Love. I feel in love with her and with the colder months approaching I thought she might come in handy. With my family you would have thought that winter descended upon us this weekend. They all brought shorts, capri's and sandals because it was 85 on Friday but it was 48 when we left for church this morning. They were talking about winter coats. Silly girls!
I made a trip to Detroit a few weekends back to meet up with Paula and we made our way to Scrappy Chic. This was an adorable scrapbooking, papercrafting store. I found the most wonderful October Afternoon 12x12 paper called Very Jolly. Yummy pinks and snowflakes. I paired it with Graphic 45's new holiday 8x8 paper for some teal shading - besides, I thought it looked like a nice snowy night. Then I used Prism cardstock in teal shades for matting.
Coloring was done with copics so I stamped with Memento Tuxedo Black ink onto Neenah Classic Crest Solar White cardstock. I added glitter with my Quickie Glue pen to set the winter scene. The hat needed some extra fluff so I applied Liquid Pearls and then glitter and I think it did the trick. A black Glaze pen gave some shine to the buttons down the coat. The sentiment comes with the image - another twobie (two for the price of one) Woo Hoo. I made it into a pennant and adhered it under a double felt snowflake from Stampin' Up! The teal brad is really a piece of plastic that Mary Maxim sold in a bag to fill jars with or bowls that hold candles etc. I thought it would be a cheap brad alternative since it was flat on the back side, they were plastic and they were on sale with a bag of about 500 for $3.00. Then I split it with a friend. Love finding craft supplies in the most unusual places.
The snowflake border was made using my new EK Success punch. Yes Scrappy Lin, I could find a use for a new punch. I love snowflakes - they can be used all winter long so I'm a sucker for every new product that comes out using them. Some maching stitching finished this off. Easy Peasy!
See ya a little later this week for another project I worked on this weekend! Enjoy and thanks for stopping by.
Cath
Friday, September 24, 2010
Little Emmy for Bellarific Friday
Woo Hoo. Another week is done! And I'm looking forward to this weekend 'cause my Mom, Aunt and cousin are coming for a visit. We'll be hanging out making cards and stuff all weekend. Yipee!
But first, let me show you what I made for this week's Stamping Bella sew or faux challenge. Of course, I sewed. I'm amazed that you can sew paper as easily as you can sew cloth. Well, it's not so easy for me...I never was a great sewer. But, slow and steady wins the race and for this it was pretty easy; all straight lines. I did change out my thread from white to black just to give a little contrast between the image and sentiment panels and my background. Little Emmy is a cutie. Have a look.
I started with Bella's bestest paper, memento tuxedo black ink, colored with Copics and added some shading with prismacolor pencils blended with gamsol. The sentiment comes with the image so it's a two for one deal. Sweet!
The design paper is from a K&Company Specialty pack for Valentine's Day. I loved how the hearts tied to the heart on Emmy's shirt. The black design paper is from a Making Memories 8x8 pack titled Weddings. The scallop was cut using my new MFT die-namic. Love this tool. It's so easy to use. A simple prima paper flower was adorned with a colorful prima pebble. Got that little bauble from Mary Maxim.
Our Mini-Bella's participated too and did some machine sewing on their cards for the first time evah! Yeah, so glad you girls stepped up to the challenge. Let's see what they have to share with us today.
Madison has colored Butterflyabella...
McKenzie has colored Fluey Huggabugg...
Head on over to the Bella Blog to see what all the other Sistahs have made. Leaving a comment gives you a chance to win $10 in Bella Bucks...easy peasey. Then you could go shopping and buy some of the new stamps she released this week. Three holiday Mo's, vol 25 and a Green Bean Baby Peeps decorating the tree. You'll love them. Hope you can join us for next week's challenge too, it's Halloween! I love making Halloween cards. So get your Halloween Bella stamps out and send a photo of your card, bag, tag or whatever to Emily by Thursday night. Can't wait to see what you make.
Have a great weekend!
Cath
Wednesday, September 22, 2010
Baby Bella Pumpkin
I've been in a Halloween coloring mood and found this little cutie while searching Stamping Bella. So Baby Bella Pumpkin got some ink this weekend along with my new Boo sentiment.
I started with Bella's bestest paper and Memento Tuxedo Black ink and colored him up with Copics. I didn't think he would look right with ground shading (sorry Paula) but I did add some shading around him with my prismacolor pencils shaded with gamsol. The sketch was one of Jen delMuro's SFYTT. I've seen quite a few artists using it and had an idea so I ran with it. You see, Paula had given me some adhesive cork that I hadn't used yet. I thought it would be great with all the fall colors. What d'ya think? I just cut circles using my Nesties. I also wanted a little pop so I added a little Sakura glaze pen to the eye, nose and mouth on the pumpkin face.
The paper on the bottom of the card came from a pack in Target's dollar bins last year. The dp on the circles is Basic Grey Erie and the top paper is a scrap from last year folks and I had cut the bottom off. Drat! Cardstock is Bazzil.
I've heard lots of talk of a surprise on the Stamping Bella blog so be sure to stop by and see what's up! Also you have until Thursday night to send Emily a picture of your card if you want to play in this week's Bellarific Friday challenge...piercing or sewing. Won't you join us?
Monday, September 20, 2010
Bed Bugs are In.
When my daughter was young, we visited one of the old barrack houses at a Fort in Upstate NY. It was there that we learned the meaning of "Don't let the bed bugs bite" and the next line "and if they do squish them with your shoe and God Bless you!" Yup we sing it all the time now - kind of rhymey and sing songy. You see, the old beds were stuffed with hay and the hay often harbored bugs. Thus - don't let the bed bugs bite was said each night. Can't believe that bed bugs are back!!! What the heck - in this day and age?
Today I have a bed bug to share with you that you might not mind getting. It's Bedbugg Huggabugg designed by Christy Croll for Stamping Bella. She was colored on Bella's Bestest paper with Memento Tuxedo Black ink and colored with Copics. I also added shading with prismacolor pencils blended with gamsol. A clear Glaze pen was used to make the spots of the bed spread shine. Love that! And glitter was applied to the wings and antenae with Quickie glue.
The image was cut with Nestabilities Circle and Scalloped Circle dies. The border was cut with a MFT Die-namics die. Design papers are from October Afternoon. A simple sheer ribbon from Mary Maxim was tied into a bow to finish this off. I even left it sentiment free which always feels naked to me. ACK!
Hope you aren't having problems with bed bugs in your neck of the woods.
Tomorrow is Tooosday - so don't for get to head over to the Stamping Bella Blog to see what's on special this week. I've seen rumors about a surprise on Wednesday as well. Woo Hoo.
Enjoy your week and thanks for stopping by.
Cath
Sunday, September 19, 2010
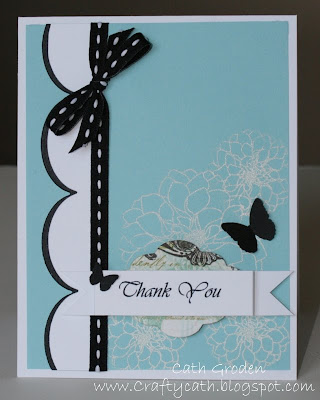
Simple Thanks
Hello folks! I have a simple thank you to share with you today. I cased a card by Amy Sheffer for this one. I loved her color combo - teal, black, white. I didn't have all the components she had so I did modify this a bit.
I started with Neenah classic crest cardstock for the card base, added some teal cardstock from my stash. I had to use one of the new sets I got for my Birthday from Papertry Ink - Delightful Dahlia. I first stamped it with Staz On Opague white ink, sprinkled white embossing powder over and heat set. The scallops were cut with another Birthday gift - MFT Die-namics. The sentiment was computer generated and cut into a banner. The panel behind was cut from Webster Pages with a Nestabilitie Labels 6 die. Finishing touches were butterflies cut from a Martha Stewart punch and a simple ribbon bow from my stash.
No coloring but full of color. Woo Hoo.
See ya tomorrow with a Huggabugg.
Cath
Friday, September 17, 2010
Trick or Treat
Woo Hoo it's Friday once again! Can't believe how long it seems to take to get to this day but I am so ready for two days of play time. And to add to the excitement, it's Bellarific Friday! So we get to head to Bellaland to see what all the sistahs have created for this weeks challenge.
Lindabella gave us a sketch to work with this week and I must say, I LOVED it! I love square cards. Her sketch was pretty simple and guided you to a well laid out and embellished card! Yeah. So what'd I use...well I was in the mood for some more Halloween cards so Trick or Treatabella it was.
And I'm gonna throw you a curve ball...you know the saying - when in Rome do as the Romans do? Well all my fellow Bella Babes use Bella's Bestest paper and Memento Tuxedo Black ink. I've rarely used anything other than Neenah because that's what seemed to blend the easiest and gave you nice sharp colors without bleeding your Copic markers. Well girls, today I tried Bella's Bestest. Paula was generous enough to share some of this with me so that I could give it a try. She's a pencil gal and she knew I was skeptical. Well, they've made a convert out of me. I LOVED this paper! Nice and smooth and the markers glide and blend beautifully. Yum, I'm in.
So onto the deets...My paper is a combination of Making Memories Polka Dot Stripe Spellbound and and My Mind's Eye the Spider Web. They are both from last year but I had a stash of them (big surprise there right?). The cardstock is from Bazzil. The black border was cut with a Martha Stewart border punch. The Olive Green Ric Rac was cut with a Papertrey ink die. A few pieces of orange raffia filled in for my usual ribbon and I topped it with a simple button. Some machine stitching and shading with prismacolor pencils blended with gamsol finished me off.
Our Mini-Bella's played along this week again. Now at first McKenz complained about having to do a sketch but I must say she rocked this! Remember folks, she's 9. Here's Parisbella. Isn't she sweet? Great job on the computer generated sentiment.
And Madison made Daintybella. It's beautiful Girl! Love your computer sentiment too!
Head on over to the Bella Blog to see what everyone else has made and leave a comment for a chance to win $10 in Bella Bucks. And get your Bella's out so you can play with us for next week's challenge - paper piercing or stitching. Now that's piercing as in faux sewing for those of you who have not tackled a sewing machine yet - McKenz. Wouldn't you love a chance to win $20 for participating? Woo Hoo!
Have a great weekend and thanks for stopping by!
Cath
Tuesday, September 14, 2010
Baby Cakes
Today's card uses Babycakes by Stamping Bella which I did just because...because I saw PaulaBella do this card that was fantastic, because I always need baby shower cards, because I just wanted to play with my pencils.
As it turned out, my sister needed a card for a friend of hers that just had a boy and this one fit the bill. Since I didn't have a gender or occasion in mind, I stuck to neutral shades of teal, yellow, some soft blues and pinks. That way this could have gone to just about anyone. I started with Neenah Classic Crest solar white cardstock and inked it up with Memento Tuxedo Black. Coloring was done with Prismacolor pencils blended with Gamsol.
I had just gotten the Thrift Shop 8x8 paper pad by October Afternoon, so I used that as my background. Matting was done with Bazzil black and Martha Stewart teal. The image was cut out with Circle and Blossom Nesties. The ribbon is also Martha Stewart. Since I didn't know what this was going to be used for, I left it without a sentiment - I rarely do this because I feel like it leaves a card naked but I think it worked out here.
Don't forget to hop on over to the Bella blog to see the Tantalizing Tooosday specials. Leaving a comment might just win you some Bella Bucks! And you still have time to make a card for this week's Bellarific Friday challenge - the theme is a sketch from Lindabella which you can find on my post here. Just send your card to Emily by Thursday night.
Thanks for stopping by.
Cath
Sunday, September 12, 2010
Holiday Wishes
This week's holiday card uses Stamping Bella's Candy Jar with Holly image. This neat little stamp also comes with two holiday sentiments as well.
Who can go through the holiday season without putting a candy jar out? I know it can be my diet downfall. It's so easy to stop by and pick one out. Then you stop back for another and before you know it it's hard to stop. My favorite holiday treat is definately Peanut Brittle. Grandma Soporito always made a tradition of hunting for the blanched peanuts and making batches of this treat to share with everyone. Thank goodness my mother has the recipe and continues the tradition.
Back to the card. Today I did clean and simple. No stitching because I wanted a card that could be duplicated quite easily. Coloring was done with Copic markers. The candy swirls were added with a white Sakura Glaze pen. I left this without alot of extra shading and simply added Swarkovski red crystals and a fine silk ribbon tied into a bow as my only embellishments. The design paper is K&Company. There are two new 12x12 packs out there that I've seen so far so check through them before you quick grab one.
Don't forget to check the Bella blog...Emily should be posting the submissions from last week's Bellarific Friday challenge. I can't wait to see what everyone did.
Hope you have a great week.
Cath
Saturday, September 11, 2010
Loralie - Halloween
Yeah, I've finally got a finished card for the October Mary Maxim Copic classes to show you. We choose a Loralie stamp that seemed appropriate... masquerade dancer!
Oh my, I had never seen these stamps before the Novi stamp show in August. But I was very intrigued by the oversized characters. Then Mary Maxim got them in. Rainbow Beauty looked great to decorate Halloween style. Since it's a Copic class, I stamped this image on Neenah Classic Crest cardstock with Memento Tuxedo Black ink. Shading was added around her and under her with prismacolor pencils. Then, I lifted the skirt with an extacto knife and added some tulle for a nice fluffy lift. Glitter sprinkled with a Quickie Glue pen on the mask gave it a lift as well.
The design paper is from the new Graphic 45 Halloween collection. Loved it! I used the less designed back side so that it would match the harlequin top. Now that wasn't part of the stamp - I had to hand draw that! But I loved the way it looked with the dress. Actually, it's what attracted me to the stamp and then I found it wasn't part of it. Hmph! Now I was challenged to make it work.
A simple sheer ribbon completes the ensemble. If you're in the Port Huron, MI area, give the store a call so you can reserve a spot in one of our classes. I have the contact information listed on my right side bar. They're free and we have a great time!
Have a great evening! I'll try to be back tomorrow with another creation to share.
Thanks for stopping in.
Cath
Friday, September 10, 2010
Go Penn State!
Woo Hoo, it's Bellarific Friday again at Stamping Bella! I love Fridays and they've just gotten better. Were you able to play along this week? The challenge was "Back to School" - whatever that means for you. Well my kids are well past the back to school age. We only have one left in her Senior year at Central Michigan. But I do have a niece that is starting her Freshman year at Penn State. I wanted to send her some snail mail and thought a little cheering from PomPomabella would be appropriate.
I've stamped this cheerleader with Memento Tuxedo black ink onto Neenah Classic Crest cardstock. Coloring was done with Copics while shading was added with prismacolor pencils blended with gamsol. I again added some extra shading with Wheat VersaMagic chalk ink while the panel was left in the Circle Nestie.
A scallop ruffle was added using the EK Success scallop border punch. I simply layered two together. The Penn State mascot logo was generated on the computer and added to the far right scallop to tie in the Penn State theme as well as the Blue/Grey colors.
A fluffy bow was added to the main image panel - it gives you so much more room to punch a hole in the image panel - love the person that tried this first! I had to make this girly so I added glitter with my Quickie glue pen to the pom poms and the bows in Bella's hair. I even added a little shading to the pom poms with my Signo Uniball White pen. Love the texture this gave to them.
Mini-Bella McKenzie has a submission for us as well. She has colored up Stamping Bella. McKenz is using a wheeled backpack for school this year. She was also told that she had to "dress to impress her teacher" for the first day of school so she felt this image would fit the bill as a back to school card.
Next week's theme is a sketch from Linda Bella.
Hope you can find some time this week to play along. Regardless, don't forget to hop on over to the Bella blog to leave a comment for a chance to win $10 in Bella Bucks.
Thanks for stopping by!
Cath
Stamp: Pompomabella - Stamping Bella
Paper: Making Memories - Poolside, K&Company - Blue Awning, Bazzil cardstock
Ink: Memento Tuxedo Black, Copics
Accessories: Circle Nesties, dimensionals, glitter, Quickie Glue pen, Signo White pen, Wheat VersaMagic chalk ink, EK Success scallop border punch, satin ribbon
Size: 6x5
Wednesday, September 8, 2010
Triple Decker Prezzies...
Who doesn't love prezzies? I was pretty lucky last week, I got a few for my Birthday and decided that they warranted some love back. I had the perfect image...Triple Decker Presents from Stamping Bella. They're neat little packages all lined up and waiting to be colored. Spots, stripes...Ohhhh. Love em. What color should I do? Well, I'm loving the pink and I had some yummy papers to use so I was off on a mission.
Here's take number one...
Isn't this cute? I made a bunch of these as 4 1/4 inch squares. Perfect for a little note. Coloring was done with Copics so I stamped it up with Memento Tuxedo Black ink on Neenah Classic Crest cardstock. I wanted to add detailing so I highlighted the circles with a Clear Saukura Glaze pen. The bow on top was decked out with glitter adhered with Quickie Glue. A scrap piece of ribbon topped with a button was my only embellishment.
Here's a look at the inside...
This stamp comes with a cute little mini as well so I stamped it inside with VersaMagic chalk ink and left it uncolored. Simple and I love the effect.
Just because I wanted some variety, I made another set as well. This time I kept the colors brown and pink.
That's it for today folks. Thanks for stopping by. Hope you can play along with this week's Bellarific Friday challenge - Back to School. And that is whatever that means to you...a chance to relax with some joe, reading time with the kidlets...just send your entry to Emily by Thursday night.
See you Friday,
Cath
Tuesday, September 7, 2010
Birthday Boy!
I love when cards just come together. My nephew has a birthday he's celebrating this weekend and he's no longer in the cutesy age bracket. What to do? No coloring, no ribbons, no bows...I pulled out the Cuttlebug, Swiss Dots embossing folder and Nesties and went to work on stars. I love stars! They're uplifting and bright and make me think happy thoughts. So I went to work on stars.
Primary colors always work well so I grabbed a pack of paper by Making Memories that I've been hoarding for over a year now. It was on clearance at Target (go figure) and was all boy themed. With the aid of Sweet Stop Sketch #71 I quickly got the job done. My fellow Bella Babe, Dana, always uses these and I decided to give it a try. Love how easy it was to find just the right layout, put it together and go.
And I can't believe it but there wasn't any coloring or stamping on this card. The sentiment was computer generated as well as the inside. Take a peek here...
Woo Hoo - I'm not one for kits but this little set had all the components to make this work, including the scallop strip inside.
Have a great week everyone!
Cath
Paper: Making Memories 8x8 Big Kids Boy, cardstock - Bazzil
Sentiment: computer generated - font LD Traditional Print
Accessories: Cuttlebug, Swiss Dots embossing folder, Circle Nesties, Star Nesties
Size: 6x5
Sunday, September 5, 2010
One down...can't even think how many to go!
I guess it's time to hop on the band wagon...the Christmas card making frenzy band wagon that is. Linda posted this week that she has plans to make one holiday card a week to tackle this task. I've never been on time with making ALL my Holiday cards. Can't even imagine MAKING that many. And at this point, I don't think one a week will actually supply me with enough for all my family and friends that I would like to make one for. But, she's right, you can't wait forever and one is better than none. So I started with Penelope with Prezzies from Stamping Bella.
I have a niece that will be getting this card along with her Christmas presents this year. The image reminds me of her and I just love the look of these presents. They are so fun to color. I've highighted the circles in the wrapping paper with a clear Sakura Glaze pen as well as adorning the bow on top with some Bella glitter applied with Quickie Glue. If you haven't tried this adhesive yet, I highly suggest it. It's easy and neat and your glitter really pops.
Since Copics give a rich vibrant color, I started there. I'm thrilled with how velvety the red dress turned out. Just build layers of red and blend it out. And since I chose Copics, I stamped this with Memento Tuxedo Black ink on Neenah Classic Crest cardstock. Of course, I shaded around the image with prismacolor pencils blended with gamsol. The tan shading is actually Wheat chalk ink from VersaMagic that I blended while the panel was still in the Circle Nestie. I love the look of punching a hole in your main design panel so that a bow will sit on top rather than crowding to the side so I've done that here as well.
Ok, now that I've got one down, perhaps it won't be so hard to do another.
Hope you are enjoying your Labor Day weekend. I am thrilled to have another day to hide in my craft room.
Don't forget to stop by Blogabella to see what's on special this week for the Tantalizing Tuesday sale. A small comment from you might turn into some Bella cash. I won $20 the previous week and just bought some of last week's specials - did you check out Battiful Darling for just $0.50? How sweet is that - just in time for Halloween. Elaineabella did an awesome card this week showcasing this stamp.
Thanks for stopping by and see you soon.
Cath
Stamps: Penelope with Prezzies and sentiment(Stamping Bella)
Ink: Memento Tuxedo Black, Copics
Paper: red dp-Basic Grey, June Bug, greeen dp-Graphic 45, cardstock Bazzil
Accessories: Prismacolor pencils, gamsol, Sakura Clear Glaze pen, Quickie Glue, Bella Glitter, Martha Stewart Embossed Zig Zag punch, sheer ribbon, dimensionals, Nesties Large and Small Circles, and Labels 3
Size: 5x7
Friday, September 3, 2010
Friends come in all shapes and sizes...
Ain't that the truth! And we never know where we'll meet them. This is my first Bellarific Friday post as a Stamping Bella Babe. Woo Hoo. The theme this week was Animals and I chose to use Cristy Croll's Friends come in all shapes and sizes stamp 'cause I loved the message. I am so grateful for everyone that I've met along the way.
Isn't this image adorable! It would make a great little girl's birthday card too! Neenah Classic Crest Solar White cardstock was my starting point along with Memento Tuxedo Black ink. Next came coloring with Copics and shading with prismacolor pencils blended with gamsol. I know I'm repetitive about that but thankfully mixing up the colors never makes it boring. Glamor Dust Glitter was applied with a Quickie Glue pen on the crown and along the skirt of the Princess. Every little princess deserves to have lots of sparkles right? For a smidgen more, I added a couple tiny pink swarovski crystals along the right side and again on the sentiment panel. Speaking of which, the sentiment was cut with a Spellbinders Oval die and matted with Labels 10. The main image was matted with cardstock and then backed with the Spellbinders Classic Scalloped Rectangles. The design paper is October Afternoon Ducks in a Row. An 8x8 pack that I hoard. But the big circle pattern matched the big cirles in this little lady's skirt. Woo Hoo. And I know that card sizes can be deceiving in photos so note that this is actually 5x7. I finished it off with a sheer fluffy ribbon bow.
And here is Mini-Bella McKenzies card. She was busy last week using Little Mavis and has another creation to share. In case ya'all didn't know McKenz is my 9 year old niece and she loves to create with me and da Bellas.
The Bella Babe lineup has grown this week so don't forget to visit the Stamping Bella Blog to see all their creations too. One lucky commentor has the chance to pickup some Bella bucks. It might be you! Next week's challenge is "Back to School". I had an Ahha moment and know exactly which Bella stamp I am going to work on this weekend. Won't you join us too? Simply send Emily a photo of your creation by Thursday night.
Now, I know that last month brought on some real creativity from the sistahood. About 50 participants joined in each week to showcase their bestest work. I am grateful beyond believe for this opportunity to be part of the team and to promote Stamping Bella products - an easy task I might add as they are so darn stinkin cute! But I want to share with you that creativity is a journey.
So here's my story (a condensed version so you get the gist of it without boring you). I started stamping about 12 years ago. My Mom made cards and dragged me to a party. I quickly realized that I wanted more than just stamping images and cutting paper. A dear mentor introduced me to the Internet. Through the Internet I found oodles and oodles of card styles and designers but the first blog I ever visited was Amy Sheffer's. That girl knows how to make cards! I was always casing her designs. She participated in the Saturday SFYTT with Jen. Jen was a Bella Babe so I started visiting the Bella blog. Colored images started to draw my attention so I went to a Copic Certification class. Amy had a post about an awesome blog - Heavens Created This. I clicked on every photo Linda, another Bella Babe, posted seeking to gain a better understanding of shading and depth with her beloved Copics. My dear son sent me to a pencil coloring class with Paula Williamson yet another Bella Babe as a Christmas gift this year. (Are you seeing the pattern here?) Paula gave me a hands on lesson of building color. With each step along the way I have been drawn to places, images, people that make me happy and feel at ease. Crafting has to be fun. It can be a challenge but what makes this such an outlet for me is that I get to play and make others happy around me too. (At least I think I do.)
During the August DT search - I was crazy about showing you my best work. And yes I had a meltdown or two. But I have the best darn husband around. He went into our bedroom and grabbed this off his dresser.
You're laughing aren't you? Hang with me though. This is a card I made for him about 6 years ago. I hadn't found the Internet yet so this was greatly influenced by a company that liked to cut or rip paper. I also didn't have nearly the supplies that I do today. The gift the kids and I gave him was a trailer so he could tow his Harley for long distance trips. I'm a sissy and hated to have my butt go numb. The annual road trip to Lake George, NY just got 4 hours longer with our move to Michigan - so 10 hours was a little past my limit. The gift might clarify the use of the papers and Harley brad - a bit anyway. But the message is what's important here. He told me "that was then and this is now. It doesn't matter if you win the contest, look how you've grown!"
I have some wonderful new sistahs that I have been getting to know this week. Please keep coloring, keep making cards and keep tyring to be what you can be. Creativity is a journey. Thank you for your support on mine and for visiting with me today.
Have a great weekend!
Cath
Subscribe to:
Posts (Atom)