Happy Sunday everyone! I hope you were able to find time to refresh and unwind this weekend. The DH and I have spent lots of time in the gardens and enjoying the sun. Next up, we (that means he) cleaned the bike (Harley that is) to get ready for our vacation next week. We're heading to Americade in the Adirondak mountains and we are so looking forward to getting away for 5 days! Yup - this will be the longest stint since January that I won't be able to make cards. DH is a little worried I'll go into withdrawal without sitting at the computer blog surfing each night. I think I'll survive but I will miss y'all.
I was very productive today and have lots to share.
First up - it's graduation time.
I thought I'd pull out stars. I love stars - they shine and guide you and
twinkle wherever you are. They make me happy and I thought they were a perfect addition for graduation wishes. The DP is from K&Company named Blue Awning and it fits the school colors I have in mind perfectly. I've been eyeing this for some time and finally caved in the last time I was in NY. FYI Michaels sells it cheaper than AC Moore and I had a 50% off JoAnn's coupon. How sweet was that? The card stock is Bazzil.
Since I didn't have the perfect stamped sentiment I came up with one and generated it on my computer using CK Jacques font. I had really wanted to buy this font when ScrapNFont was selling off the CK line but I played frugal and said no. The next week CK started marketing the fonts themselves. They even offer one free every Friday and I was so thrilled that this was their first one. Whoo Hoo.
The image was stamped with Navy StazOn ink from the Nightingale set by Inqueboutique. The stars were cut out using Cuttlebug dies. The navy ones were highlighted with Faded Jeans Distress Stickles. I didn't have the right shade of Dew Drops but not to worry I colored some silver ones with my Prussian Blue (B39) Copic Marker. You'd never know they didn't come that color! If you look close, you can see the paper border I added alongside the stripe DP. It was done with the Cornice border punch by Martha Stewart.
I used the same font on the inside computer generated sentiment. This was my first time using my new Spellbinders Label 3 dies and I love them. That's it for this one!
Next up is a simple note card. I made this some time ago and just dug it out to send to someone so I thought I would share it with you. It's pretty simple. The image was stamped with Versamark and embossed with white EP. This is one of the stamps from the SU Boroque Motifs set. The sentiment is from Savystamps.
Isn't the ribbon yummy? It's double sided and I found it in the $1 bin at Michaels when they were on sale for $0.75. You know how much I hoard ribbon - lucky I could only find one - the DH doesn't think I could possibly use all the ribbon I have! Now I didn't own a Nestability at the time so this was all cut by hand.
Hope you all have a great week. Thanks for stopping by.
Cath
Sunday, May 31, 2009
Thursday, May 28, 2009
I love Shimmerz...
Ok folks, I was blog hopping again and found that there is a Shimmerz give away that I would like to tell you about. For those of you that don't know, Shimmerz is a glittery - shinny paint that you apply to your embellishments or papers to create sparkle and well, shine! They are so cool. I have been wanting them for some time. They are available at many on-line retail stores and also through the Shimmerz store. If you're lucky, you might be able to win a bottle by visiting this site - grabbing a blinkie like the one I added on my right tool bar and then going back to the site to tell them the deets of your blog. You have until May 30th to do this so hurry up - what are you waiting for?
Good Luck and have fun!
Cath
Good Luck and have fun!
Cath
Wednesday, May 27, 2009
With Sympathy
Hello Everyone!
I've had a request for a sympathy card so I dug into my stash and this is one that I made a while back...
The cross stamp and sentiment are from Hobby Lobby. The beige and black panels were cut from the Spellbinders Level 2 die set. I added some black brads, black Swarkovski cyrstals, and ribbon tied with hemp. The DP was a random scrap and the base of the card was black cover stock. The card size is a 5 inch square.
Hope you can find some inspiration in this sample.
Have a great night and thanks for looking.
Cathy
Sunday, May 24, 2009
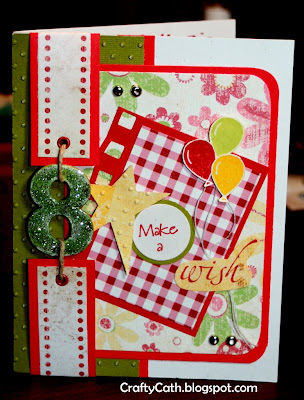
8 is Great!
Well, it's finally here. My nieces Madison and McKenzie are finally celebrating their 8th Birthday this weekend. Aug Dog and I wish that we could have been there to share in the fun but we headed to NY instead to attend a Gilmore cousin wedding. I know that you have seen much to do about the girl's invitations on my posts but when I sat down to make their card - I just couldn't stir up enough creativity to fit the Rock Star theme in. So I pulled out my card layout binder and found this...
I loved the layers and colors. While this looks intricate, it's just detail work - not hard. I actually pulled out lots of scraps which made me feel great. If you follow my blog enough you know that my inspiration is usually a layout I have seen before that I try to duplicate and this is no different. We can thank Amy Sheffer yet again for another beautiful design. It really does make the task easier if you have something to follow and Amy's cards provide wonderful inspiration.
I found the DP on clearance at Hobby Lobby. I don't know the name but the maufacturer is The Paper Studio. The solids are mostly scraps or pieces from my John Morgan printer paper samples. Note the small red square with the neat edged border, that's from pulling it out of the spiral pack and not from a punch. Now, I do like that look so I purchased the EK Success border punch this weekend. I can't wait to duplicate this look without having to limit myself to the colors in my samples. Whoo Hoo. I delved into my supplies and found the valentine's red eyelets. Since I hardly use these anymore I was glad to pull them out. I applied Martha Stewart glitter to the chipboard number 8. I used the Cuttlebug Swiss Dots emobossing folder on the star and green stripe. The balloons were stamped using a SU set from 2002. I don't have the name to share though. The "make a" sentiment came from the SU Mini Mates and the "wish" was cut from a SU sentiment of wishes. I've also added a few silver brads and love the way this all came together.
Hope you have fun plans this weekend with family and friends. I have a few more things to post but I have some chores to do out in the yard before the wedding.
Have a great day and thanks for looking.
Cath
Sunday, May 17, 2009
Bold Floral Birthday
Happy Monday everyone!
Well, I finished an easy card to share with you. The easy part was that I followed the layout and color scheme from Amy Scheffer. I found this a while back and saved it to my "to do" list. I loved the way the deep reds mixed with the softer blue and tan.
The base of the card and the main image panel are Neenah Classic Crest Solar White cardstock. I finally got my hands on some when I went home and I'm loving it. It really has a nice feel and the Copics just glide over the surface. I'm psyched - it really does make a difference! The solid red and blue have a shimmer to them so they're reflecting light in the picture but they look neat in person. This was a Christmas clearance purchase from Target that I got for a steal. I hoarded all 4 packages of red and 2 of the blue. Whoo Hoo! I'm afraid that I used a scrap for the tan DP and I can't remember where it came from. The Birthday sentiment is from Stampin Up! My New York gang will be happy to know that I found my missing "Daisy" stamp from Inkadinkado and I used it here. Would you believe that I tore my craft space apart and gave up on finding it only to stumble upon it attached to some celephane packaging. Thank Goodness - I love this little guy. (I brought this to use when I went to NY and just about had a heart attack when I pulled out the packaging but found it missing.)
I'd like to share a tip I've stumbled on from Susan Liles for hand trimming the flower. If you cut all the petals along one side and then go back the other way, the petals won't bend. This works so beautifully.
***I have edited the above link so that it will now take you directly to Suzie's post where she gives us a tip for cutting out images like flowers or stars. Sorry for the dud link and thanks ScrappyLin for bringing it to my attention!
Lastly, if you are wondering where to find the Neenah cardstock I found that Xpedex paper stores carry it in stock or you can find it at Amazon.com. I personally would rather not pay shipping so the wait was worth it for me. You can also go directly to the Neenah website and find a local distributer. Good Luck.
Hope you all have a great week. Thanks for stopping by.
Cathy
Huggabug Hello!
Hello everyone. It's a little bit chilly today - no problem, that means I get to stay inside and create. Having a few new stamps to try out, I pulled out lovebettle HUGGABUGG from Stamping Bella. I think she is just adorable and the sentiment fits right in with the attitude she is exuding. Check her out...
Today I used the Copics more than pencils but I did create some highlights by blending and I am having great fun trying new coloring techniques. I used my Spellbinders rectangles to cut out the image panel and added a sheer ribbon to finish off the look. The DP (Out & About by My Mind's Eye) was so colorful already, I didn't want to clutter it up.
I've got more that I want to try so I'm gonna run and see what I can get done.
Thanks for looking and hopefully I'll be back later with another project.
Cath
Saturday, May 16, 2009
Ketto Smiles
Happy Saturday! I know, it seems like forever since you have seen something new from me. I have a real surprise for you today. I just got my first package of Stamping Bellas and Kettos and a Huggabugg too! If you haven't yet experienced these lovely characters head on over to the Stamping Bella store to check out the card gallery. These stamps are just too cute. I woke up early (5:30 am) so that I could play and DH thinks I'm crazy. Anyhooo, I colored with both my Copics, Prisma pencils and Gamsol and am quite happy with the result. Of course there are mistakes if you look close, so don't!
The main stamp is Maisy Ketto from Stamping Bella and the sentiment is Verve's Thankful Blossoms. I added glitter on the crown using the Lavender Spica pen and then added Martha Stewart coarse crystal glitter. I applied this to the wings as well using Linda Heaven's glitter technique found here. This is a nifty little tutorial if you're interested. Of course I used Spellbinders Label 4 and Rectangles for the main image panel and the sentiment. The scalloped border is from EK Success. The DP is from a K&Company scrap pad and Provo Craft slab. (I got both on clearance at Michaels last weekend when I went back home. I love being in the land of plenty in a real town. You know how limited my resources are here in Michigan!) I added a little SU crystal effects to the flower as well as "Copper Star" Gelly Roll accents.
We have a wedding to attend this afternoon so I won't be able to create more until tomorrow morning. Hope you all have a great day and thanks for looking.
Cath
Sunday, May 10, 2009
Happy Mother's Day
Happy Mother's Day everyone!
I hope you all have wonderful things to do today. We made the trip back to NY so that I could spend the day with my Mom. We are planning to try some techniques that we never have the time to do by ourselves. Hopefully with encouragement and inspiration we can tackle these together. We plan to play with our Copics, Gamsol and try some frame embossing with our Nesties. Can't wait and can't think of a better way to spend the day.
Unfortunately the kids are all scattered and we won't get to see them but such is the life of empty nesters. I received my first Mother's Day present at 8am this morning - kinda early for the recent graduate especially since I was enjoying my chance to sleep in - anyhoo, the son has started a new website for me. He has to help me get it up and going and import all my posts but soon you'll be seeing me at www.craftycath.com . You can check it out now but understand that it's under construction!
I thought I'd share the card that I made for my Mom. Of course, the colors and layout were inspired by Amy Sheffer from Pickle Paper Designs. Besides my Nesties and Cuttlebug I don't know how I could manage making cards without that super talented lady! She provides me with some wonderful starting points. The cards might not have the same embellishments or papers as hers but the footprint is there and I am so thankful to have found her. On to the card...
I used some velvet embossed paper I bought on clearance at Michaels for the background but I don't have any manufacturer information, added an embossed panel from my Cuttlebug framing it with my Labels 1 Nestie then added the black strip - first cutting it with my Fiskars Lace Border punch and then using the Cuttlebug Swiss Dots embossing folder. I added an oval embossed Nestie for the sentiment panel and made the flower from a Spellbinder die and the swirl from a Sizzlet. The sentiment is computer generated using the CK Bella font - love it, I have used it so many times now and am glad that I purchased it! I topped it all off with a pearl button and pearl adorned ribbon.
Here's a peek inside...
As many of you know, we commute between NY and MI. Maintaining two households can be challenging at times especially when you want something and know you have but it's in the other house. I couldn't wait to get home this weekend to retrieve my grandmother's old flower arrangement prong (that's not the correct technical term but go with it). Sometimes it's hard to get my cards to stand when they are opened up so that I can photograph them. I found that some women use a flower prong to do this. I knew that I had one from Grandma Soporito's craft supplies and couldn't wait to try it out. It works wonderfully! You can see it in the above picture holding my card open so easily. I am more thrilled to be putting one of Grandma's tools to use than I am that it holds the card so beautifully.
For all you Mother's out there - I hope you enjoy your day!
Thanks for looking.
Cath
Sunday, May 3, 2009
Weddings
I was lucky enough to to have had some inspiration from Becca Feeken today. I need two Wedding cards this month and wanted to get a head start. I remembered a card that Becca made a few days back that had caught my eye and I thought it would be perfect for these. I kept Becca's layout but since I don't have the Spellbinders Label 3 set, I substituted Labels II instead. I also added the Martha Stewart Lace Border.
Can you tell that one color theme is brown and sage while the other is burgandy? I actually used parts of the Wedding invitation for my cousin Colleen in the burgandy card. The ribbon and some of the papers have been recycled. I think it helps personalize the card more.
Gotta go make dinner now.
Have a great week and thanks for looking!
Cath
Happy Birthday Jessica!!
Happy Sunday everyone!
This post is one day early but I'd like to send some Birthday love to the daughter - Jessica Lee. May 4th marks the 24th anniversary of my labor and her delivery. And a labor of love it was! Jess was a little bummed that we couldn't spend her birthday weekend with her - somethings are just never the same when you leave the nest... Anyhoo, I got her package wrapped and sent out early last week so I made it in time. Most of you know that I have great intentions but I never seem to get packages out before events. I'm sorry, shipping everything is new to me and I was much better when I could hand deliver gifts.
Before I sealed up the card I took a quick photo to share with you.
I knew Jess would love the color combo. The DP came in a pack I found at Michaels - titled Modern Milan by Me and My Big Ideas. I loved the glitter accents and big bold colors. With the help of my Spellbinder Circle and Scalloped Circle dies I created the sentiment panel. I know the sentiment seems far from Happy Birthday but I added an identical panel inside with a personal sentiment of how she must have been loved - since she's grown into such a beautiful, responsible woman. I couldn't resist adding a butterfly using my Martha Stewart Royal Butterfly punch and adorning it with Swarkovski crystals. I finished it off with the yummy Kiwi satin ribbon.
B-day Invites are done...
Well, I got up at 6:30 am yesterday and worked on the invitations for my nieces. I had a deadline ticking away so I worked straight until 7pm to finish them off and packed them up. Girlies, you'll be happy to know that they will be in the mail first thing Monday morning.
Thank goodness I only needed seven but with all the layers, hand cutting, glitter and Stickles accents it took me awhile. Don't they look pretty?
I'm off to make some wedding cards now. Thanks for looking and enjoy the rest of your weekend.
Cath
Subscribe to:
Posts (Atom)